Showing posts with label MS Word. Show all posts

Monday, 10 July 2017

4 Free Alternatives to Microsoft Office

4 free alternatives to Microsoft Office

Microsoft Office is one of the most popular programs on the market, with more than 1 billion users worldwide. But at $139.99 for just the basic package (Word, Excel, PowerPoint, and OneNote only), it's also a little expensive. What if you can't afford it?
Thankfully, there are programs like Google Docs, Office Online, OpenOffice, and LibreOffice. They don't have as many features as Microsoft Office (think of them as Office lite), but they're free, easy to use, and readily available online. They're a great alternative if you're looking for something simple or if you can't stomach the price of Microsoft Office.
We wanted to share these programs with you just in case you hadn't heard of them before. We hope you find them useful at home, at work, or at school.

Google Docs

Google Docs is a web-based program you can access directly from your browser. This means there's nothing to download or install—all you have to do is sign in to your Google account and navigate to Google Drive (where Google Docs is housed), and you can create and store files online.
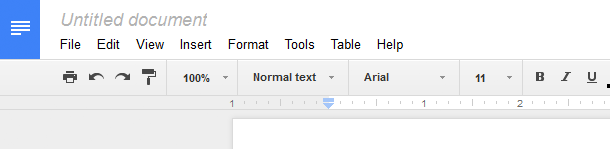
Screenshot of Google Docs
Google Docs comes with all types of useful features, like the ability to share your files with other people so you can work on them at the same time. You can also access your files on any device, including your phone, tablet, or a different computer.
To learn more, visit our Google Drive and Docs tutorials:

Office Online

Microsoft's Office Online is also a web-based program. All you need is a free account—this time, a Microsoft account—and you can access your files almost anywhere. You can also share your files online and collaborate with other users.
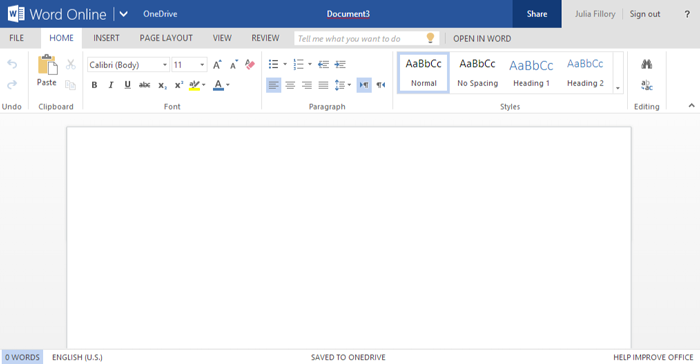
Screenshot of Office Online
The coolest thing about Office Online is how similar it is to Microsoft Office (after all, both products are made by Microsoft). It offers many of the same tools and features, just in a simpler, more web-friendly package. The interface should be a breeze if you have any experience with the desktop version of Office.
Learn more about it with our tutorial:

OpenOffice and LibreOffice

Looking for a more traditional alternative to Microsoft Office? Something that you can actually download and install on your computer? You might want to check out OpenOffice or LibreOffice.
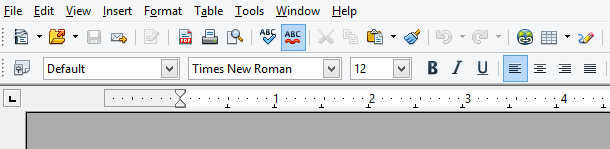
Screenshot of Open Office
These programs may not be as slick as Google Docs or Office Online, but they come with a few extra features, including a tool for creating and managing databases. You can use them for almost all of your home and office needs, and the environment is remarkably similar to older versions of Microsoft Office.
We don't have any current tutorials on these programs, but you can learn more below:
Using Mail Merge

Introduction

Lesson 24
Mail Merge is a useful tool that will allow you to easily produce multiple letters, labels, envelopes, nametags, and more using information stored in a list, database, or spreadsheet. In this lesson, you will learn how to use the Mail Merge Wizard to create a data source and a form letter, and you'll explore other wizard features.

Mail Merge

Video: Using Mail Merge in Word 2010


When you are performing a Mail Merge, you will need a Word document (you can start with an existing one or create a new one) and a recipient list, which is typically an Excel workbook. If you'd like to work along with the lesson, you can download the examples below.

To use Mail Merge:

  1. Open an existing Word document, or create a new one.
  2. Click the Mailings tab.
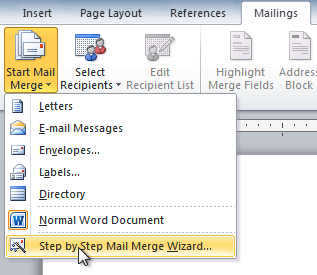
  3. Click the Start Mail Merge command.
  4. Select Step by Step Mail Merge Wizard.
    Selecting Step by Step Mail Merge Wizard
The Mail Merge task pane appears and will guide you through the six main steps to complete a merge. The following is an example of how to create a form letter and merge the letter with a recipient list.

Step 1:

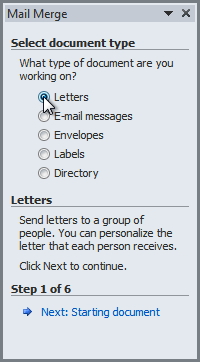
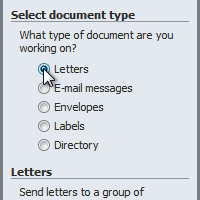
  1. Choose the type of document you want to create. In this example, select Letters.
    Selecting a document
  2. Click Next: Starting document to move to Step 2.

Step 2:

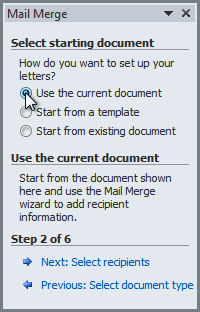
  1. Select Use the current document.
    Selecting a starting document
  2. Click Next: Select recipients to move to Step 3.

Step 3:

Now you'll need an address list so Word can automatically place each address into the document. The list can be in an existing file, such as an Excel workbook, or you can type a new address list from within the Mail Merge Wizard.
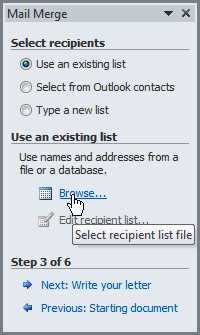
  1. From the Mail Merge task pane, select Use an existing list, then click Browse.
    Browsing for a data source
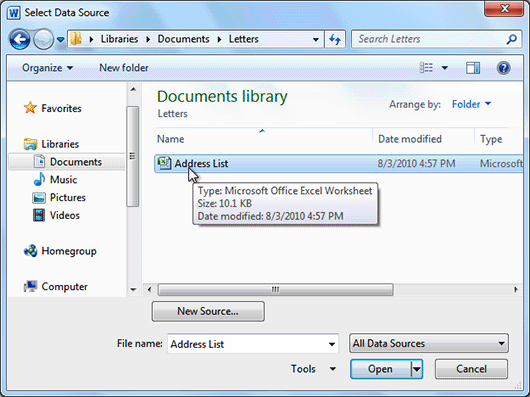
  2. Locate your file in the dialog box (you may have to navigate to a different folder), then click Open.
    Choosing a file
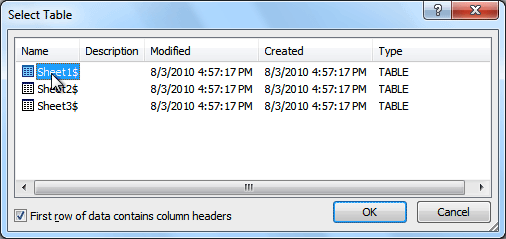
  3. If the address list is in an Excel workbook, select the worksheet that contains the list, then click OK.
    Selecting a table
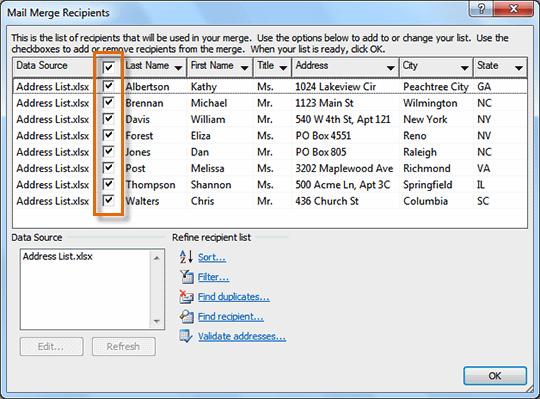
  4. In the Mail Merge Recipients dialog box, you can check or uncheck each recipient to control which ones are used in the merge. When you're done, click OK to close the dialog box.
    Use check boxes to include or exclude recipients
  5. From the Mail Merge task pane, click Next: Write your letter to move to Step 4.
If you don't have an existing address list, you can click the Type a new list button and click Create. You can then type your address list.

Step 4:

Now you're ready to write your letter. When it's printed, each copy of the letter will basically be the same, except the recipient data—like the name and address—will be different on each one. You'll need to add placeholders for the recipient data so Mail Merge knows exactly where to add the data. If you're using Mail Merge with an existing letter, make sure the file is open.

To insert recipient data:

  1. Place the insertion point in the document where you want the information to appear.
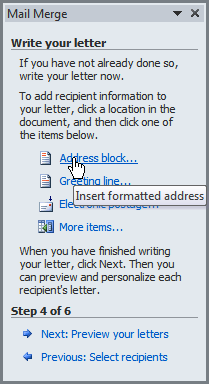
  2. Select Address block, Greeting line, Electronic postage, or More items from the task pane.
    Inserting an address block
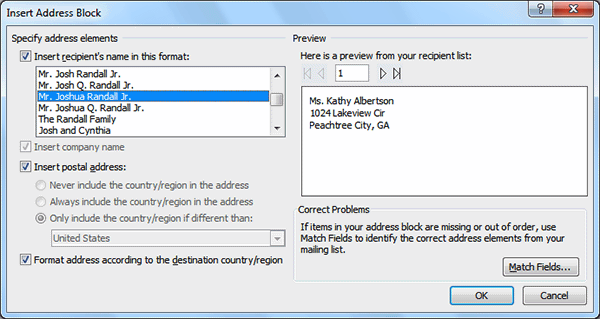
  3. Depending on your selection, a dialog box may appear with various options. Select the desired options, then click OK.
    Adjusting the address block formatting
  4. A placeholder appears in your document (for example: «AddressBlock»).
  5. Repeat these steps each time you need to enter information from your data record.
  6. From the Mail Merge task pane, click Next: Preview your letters to move to Step 5.
For some letters, you'll only need to add an Address block and Greeting line. Sometimes, however, you may want to place recipient data within the body of the letter to further personalize it.

Step 5:

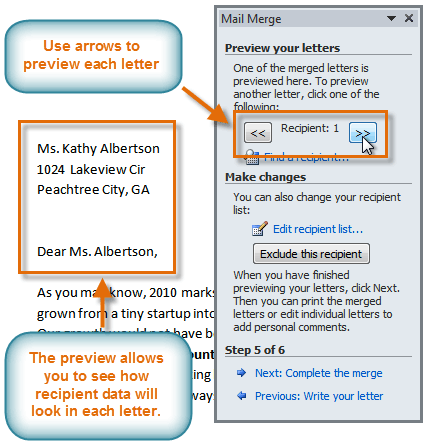
  1. Preview the letters to make sure information from the recipient list appears correctly in the letter. You can use the left and right scroll arrows to view each document.
    Previewing the letters
  2. Click Next: Complete the merge to move to Step 6.

Step 6:

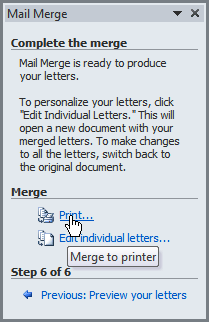
  1. Click Print to print the letters.
    Printing the letters
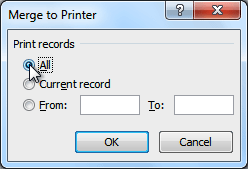
  2. The Merge to Printer dialog box opens. Click All, then click OK.
    The Merge to Printer dialog box
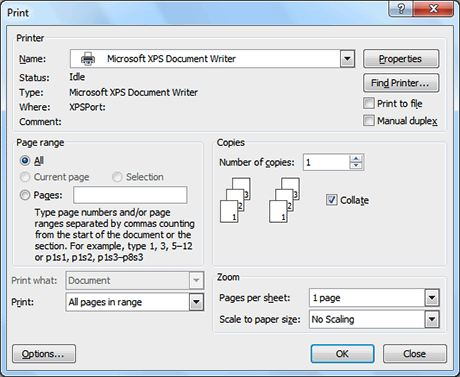
  3. The Print dialog box will appear. Adjust the print settings if needed, then click OK.
    The Print dialog box

Challenge!

  1. Open an existing Word document. If you want, you can use this example.
  2. Download the recipient list.
  3. Use the Mail Merge Wizard to merge the letter with the recipient list.
  4. Place an Address Block at the top of the page and a Greeting line above the body of the letter.
  5. Print the document.

Using a Template

Introduction

Lesson 23
A template is a predesigned document you can use to create documents quickly without having to think about formatting. With a template, many of the larger document design decisions such as margin size, font style and size, and spacing are predetermined. In this lesson, you will learn how to create a new document with a template and insert text into it.

Creating a new document with a template

Video: Using Templates in Word 2010


Templates can help you create a more professional and visually appealing document. With Word's large selection of templates, you'll likely find one to suit your purpose—whether you're creating a business card or a simple award certificate. To use templates, you'll need to know how to create a new document with a template and how to insert text into the template.

To insert a template:

  1. Click the File tab to go to Backstage view.
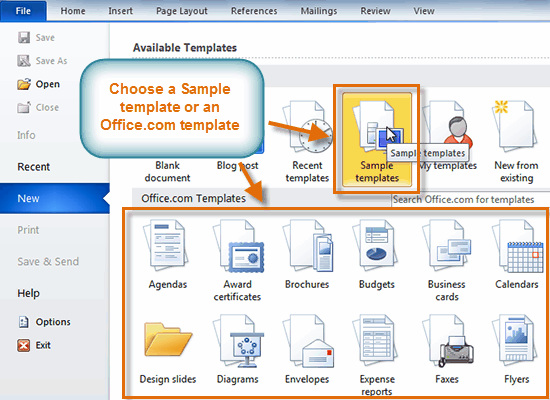
  2. Select New. The New Document pane appears.
  3. Click Sample templates to choose a built-in template, or select an Office.com template category to download a template.
    The New Document pane
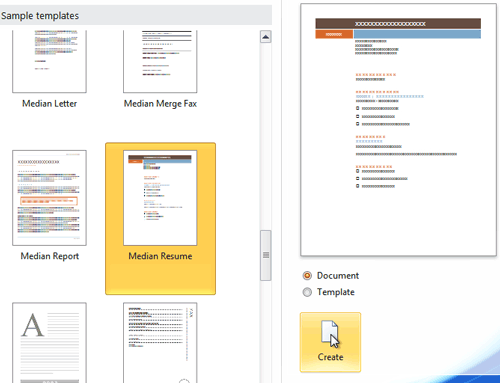
  4. Select the desired template, then click Create. A new document will appear using the template you have selected.
    Selecting a template
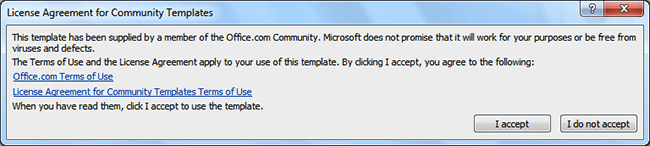
Use caution when downloading Office.com templates. Some of them are uploaded by people not affiliated with Microsoft, and Microsoft cannot guarantee that these templates are free from viruses or defects. For these templates, you'll see a warning message before downloading them.
Warning message for a non-Microsoft template

Entering information into a template

To insert text into a template:

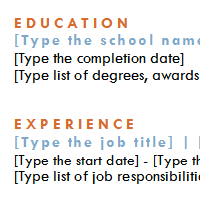
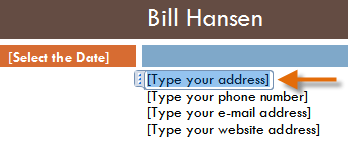
Templates include placeholder text that is surrounded by brackets. To personalize your document, you'll need to replace the placeholder text with your own text.
Some templates simply use regular text as the placeholder text, rather than the traditional placeholder text with brackets. In these cases, delete the text and type in your own text.
  1. Click the text you want to replace. The text will appear highlighted, and a template tag will appear.
    Inserting text into a template
  2. Enter some text. It will replace the placeholder text.
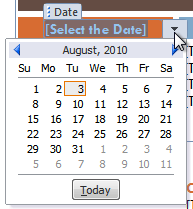
For some fields, there's a drop-down arrow you can use to select information rather than type it. For example, a date field will show a calendar so you can choose the date more easily.
Selecting a date for a date field

To change prefilled information:

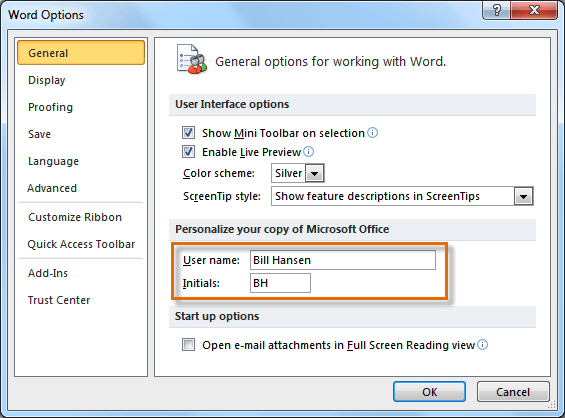
In some templates, your name or initials will be automatically added. This is known as prefilled information. If your name or initials are incorrect, you'll need to change them in Word Options.
  1. Click the File tab to go to Backstage view.
  2. Click the Options button. The Word Options dialog box appears.
  3. Enter the user name and/or initials in the General section, then click OK.
    User name and initials
If you are using a public computer, such as one at a library, you may not want to change these settings.

Challenge!

  1. Create a new document using a template.
  2. Enter some text into the template.
  3. Modify the user name and initials for your version of Word if you are using a home computer.
  4. Save the document.

SmartArt Graphics

Introduction

Lesson 22
SmartArt allows you to visually communicate information rather than simply using text. Illustrations can enhance your document, and SmartArt makes using graphics especially easy. In this lesson, you will learn how to insert a SmartArt graphic, modify the color and effects, and change the organization of the graphic.

SmartArt graphics

Video: SmartArt Graphics in Word 2010


Word has a variety of SmartArt graphics you can use to illustrate and organize many different types of ideas. To get the most out of SmartArt, you'll need to know how to insert a SmartArt graphic, modify the color and effects, and change the organization of the graphic.

To insert a SmartArt illustration:

  1. Place the insertion point in the document where you want the graphic to appear.
  2. Select the Insert tab.
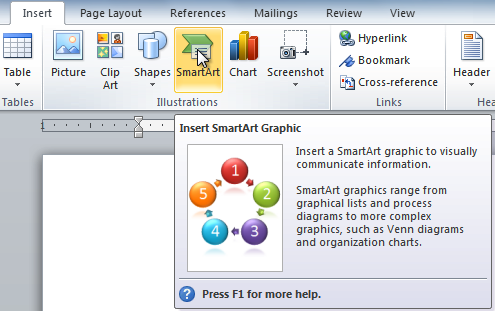
  3. Select the SmartArt command in the Illustrations group. A dialog box appears.
    The SmartArt Command
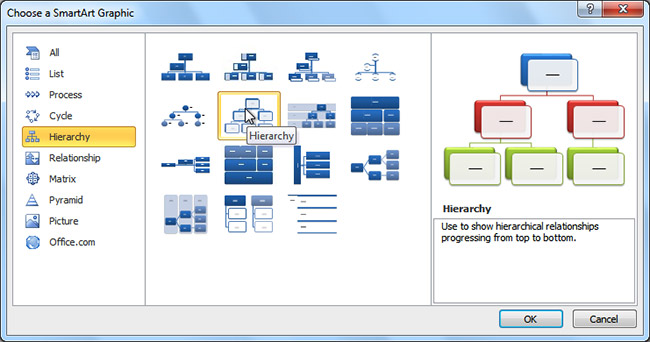
  4. Select a category to the left of the dialog box, and review the SmartArt graphics that appear in the center.
  5. Select the desired SmartArt graphic, then click OK.
    Selecting a SmartArt graphic
To see more details about a graphic, click any image and a larger preview of the graphic with additional text details will appear on the right side of the dialog box.

To add text to a SmartArt graphic:

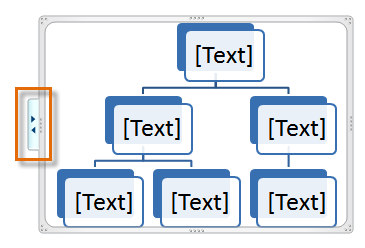
  1. Select the graphic. A border will appear around it with an arrow on the left side.
  2. Click the arrow on the left side of the graphic to open the task pane.
    The arrow to open the task pane
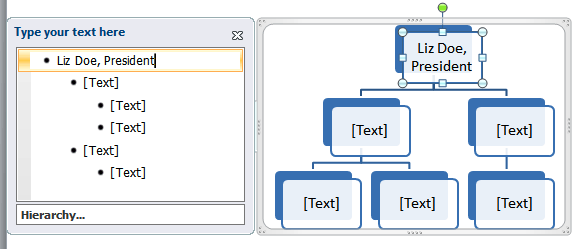
  3. Enter text next to each bullet in the task pane. The information will appear in the graphic and will resize to fit inside of the shape.
    Typing text into the task pane
  4. To add a new shape, press Enter. A new bullet will appear in the task pane, and a new shape will appear in the graphic.
You can also add text by clicking the desired shape and typing your text. This works well if you only need to add text to a few shapes. However, for more complex SmartArt graphics working in the task pane is often faster.
You can change the layout of a SmartArt graphic even after you've added text. However, if the new layout is different from the old one, some of your text may not show up. Experiment with different layouts to see how they display your text differently.

Changing the organization of a SmartArt graphic

To add a shape to a graphic:

  1. Select the graphic. The Design and Format tabs appear on the Ribbon.
  2. Select the Design tab.
  3. Click the Add Shape command in the Graphics group.
  4. Decide where you want the new shape to appear, and select one of the shapes nearby the desired location.
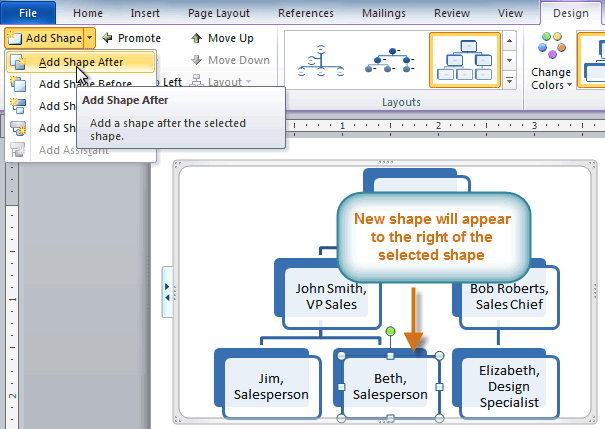
  5. Select Add Shape Before or Add Shape After. If you want to add a superior or a subordinate, select the Add Shape Above or Add Shape Below options.
    Adding a shape
You can change the layout of a SmartArt graphic even after you've added text. However, if the new layout is different from the old one some of your text may not show up. Experiment with different layouts to see how they display your text differently.

To move shapes using the Promote and Demote commands:

  1. Select the graphic. The Design and Format tabs appear on the Ribbon.
  2. Select the Design tab.
  3. Select the shape you want to move.
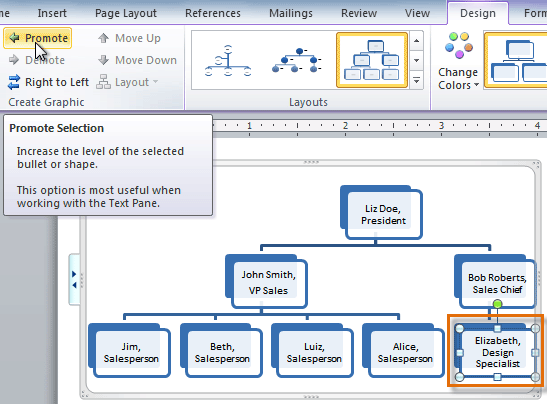
  4. Click the Promote or Demote command in the Create Graphic group.
    Promoting a shape
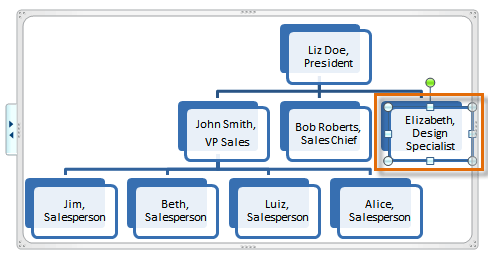
  5. The shape will move up or down by one level.
    The promoted shape
You can also demote and promote shapes from within the task pane. With the insertion point in the task pane, press the Tab key to demote a shape. Press the Backspace key (or Shift+Tab) to promote a shape. It's a lot like creating an outline with a multilevel list. For more information, you may want to review our Working with Lists lesson.

Modifying the SmartArt graphic's appearance

To change the SmartArt style:

  1. Select the graphic. The Design and Format tabs appear on the Ribbon.
  2. Click the Design tab.
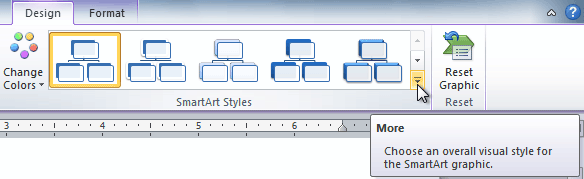
  3. In the SmartArt Styles group, click the More drop-down arrow to view all of the styles.
    Viewing the SmartArt Styles
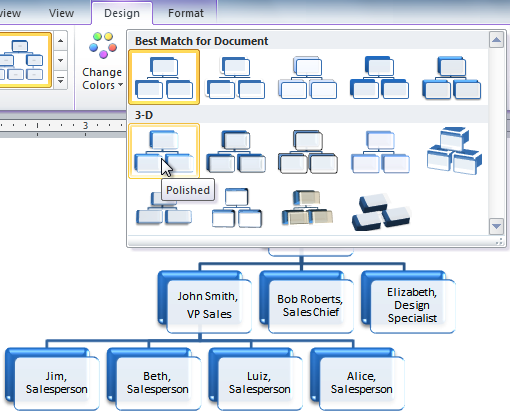
  4. Hover your mouse over each style to see a live preview.
    Selecting a SmartArt Style
  5. Select the desired style.

To change color scheme:

Word provides a variety of color schemes to use with SmartArt. The color schemes use theme colors, so they will vary depending on which theme you are using.
  1. Select the graphic. The Design and Format tabs appear on the Ribbon.
  2. Select the Design tab.
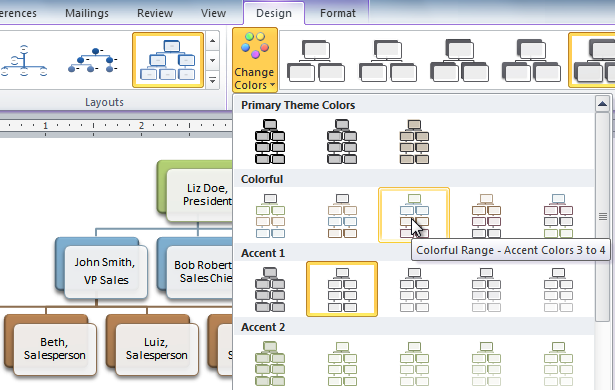
  3. Click the Change Colors command. A drop-down menu appears, showing various color schemes.
  4. Select the desired color scheme.
    Selecting a new color scheme
If you want to change the appearance of a single shape within the SmartArt graphic, select the shape, then click the Format tab. You can then modify the shape style, color, effects, and other settings for that shape.

Challenge!

  1. Create a new document.
  2. Insert a SmartArt graphic.
  3. Enter text into the graphic.
  4. Change the SmartArt style.
  5. Change the color scheme.

Working with Tables

Introduction

Lesson 21
A table is a grid of cells arranged in rows and columns. Tables can be customized and are useful for various tasks such as presenting text information and numerical data.

In this lesson, you will learn how to convert text to a table, apply table styles, format tables, and create blank tables.

Inserting and modifying tables

Video: Working with Tables in Word 2010


In Word, tables are useful for organizing and presenting data. You can create a blank table, convert text to a table, and apply a variety of styles and formats to existing tables.
Optional: You can download this example for extra practice.

To insert a blank table:

  1. Place your insertion point in the document where you want the table to appear.
  2. Select the Insert tab.
  3. Click the Table command.
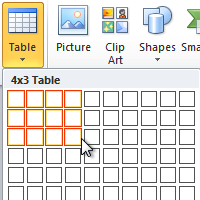
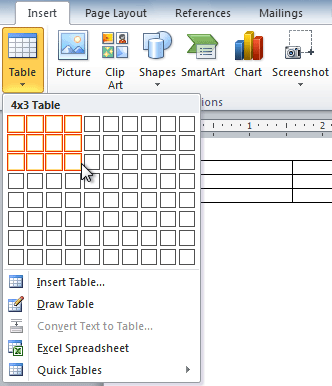
  4. Hover your mouse over the diagram squares to select the number of columns and rows in the table.
    Inserting a new table
  5. Click your mouse, and the table appears in the document.
  6. You can now place the insertion point anywhere in the table to add text.

To convert existing text to a table:

  1. Select the text you want to convert.
  2. Select the Insert tab.
  3. Click the Table command.
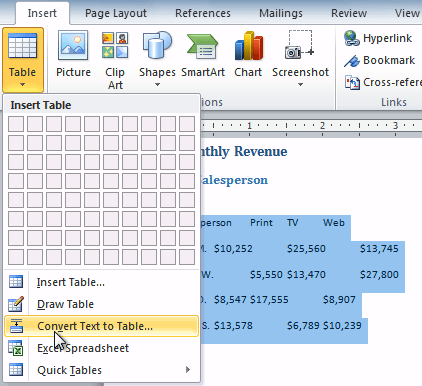
  4. Select Convert Text to Table from the menu. A dialog box will appear.
    Converting text to a table
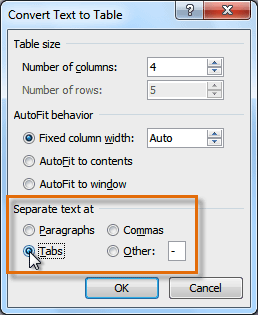
  5. Choose one of the options in the Separate text at: section. This is how Word knows what text to put in each column.
    Separating text at Tabs
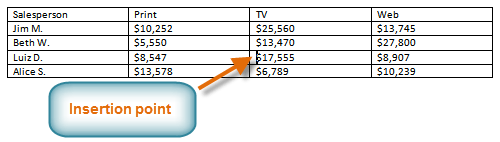
  6. Click OK. The text appears in a table.
    The converted table

To add a row above an existing row:

  1. Place the insertion point in a row below the location where you want to add a row.
    Placing the insertion point
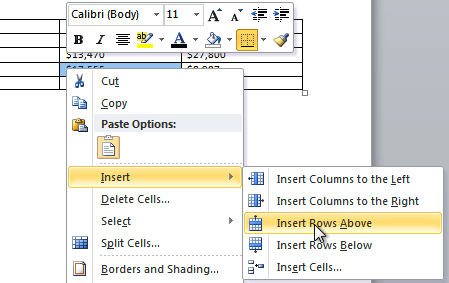
  2. Right-click the mouse. A menu appears.
  3. Select Insert Insert Rows Above.
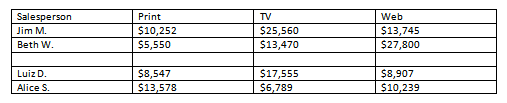
    Adding a row
  4. A new row appears above the insertion point.
    The new row
You can also add rows below the insertion point. Follow the same steps, but select Insert Rows Below from the menu.

To add a column:

  1. Place the insertion point in a column adjacent to the location where you want the new column to appear.
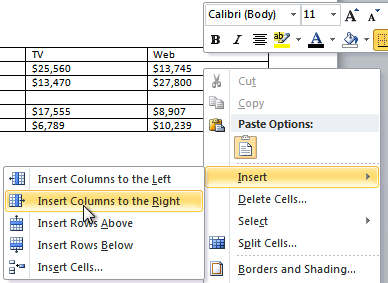
  2. Right-click the mouse. A menu will appear.
    Adding a column
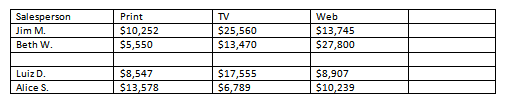
  3. Select Insert Insert Columns to the Left or Insert Columns to the Right. A new column appears.
    The new column

To delete a row or column:

  1. Select the row or column.
  2. Right-click your mouse. A menu will appear.
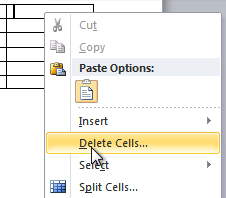
  3. Select Delete Cells.
    Selecting Delete Cells
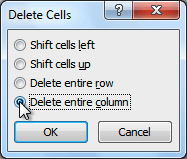
  4. Select Delete entire row or Delete entire column, then click OK.
    Deleting the column

To apply a table style:

  1. Click anywhere on the table. The Design tab will appear on the Ribbon.
  2. Select the Design tab and locate the Table Styles.
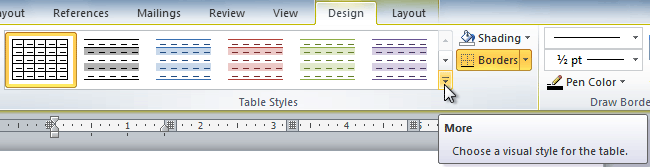
  3. Click the More drop-down arrow to see all of the table styles.
    Viewing the Table Styles
  4. Hover the mouse over the various styles to see a live preview.
  5. Select the desired style. The table style will appear in the document.
    After adding a Table Style

To change table style options:

Once you've chosen a table style, you can turn various options on or off to change the appearance of the table. There are six options: Header Row, Total Row, Banded Rows, First Column, Last Column, and Banded Columns.
  1. Click anywhere on the table. The Design tab will appear.
  2. From the Design tab, check or uncheck the desired options in the Table Style Options group.
    Table Style Options
Depending on which table style you're using, certain table style options may have a somewhat different effect. You may need to experiment to get the exact look you want.

To add borders to a table:

  1. Select the cells you want to add a border to.
    Highlighted cells
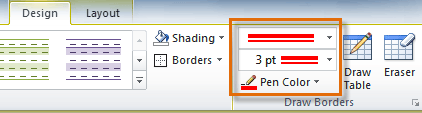
  2. From the Design tab, select the desired Line Style, Line Weight, and Pen Color.
    Line Style, Line Weight, and Pen Color commands
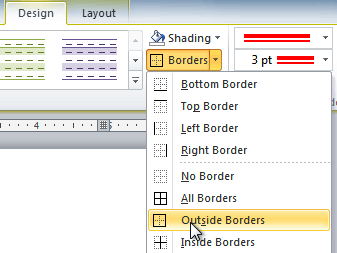
  3. Click the Borders drop-down arrow.
  4. From the drop-down menu, select the desired border type.
    Selecting a border type
  5. The border will be added to the selected cells.
    The finished border

Modifying a table using the Layout tab

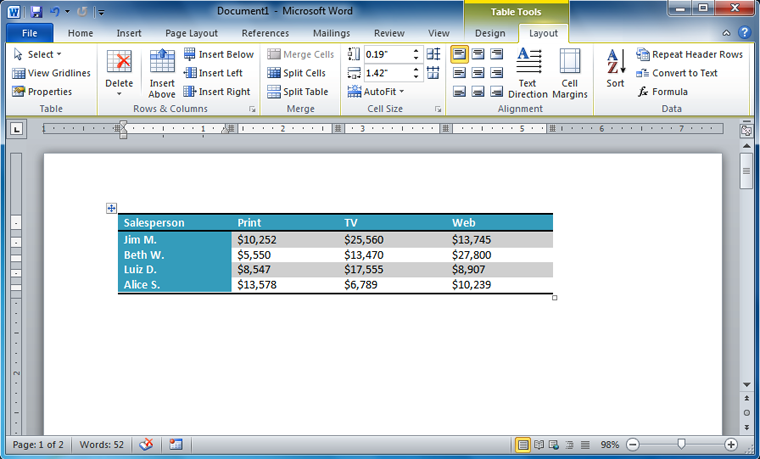
When you select a table in Word 2010, Design and Layout tabs appear under Table Tools on the Ribbon. Using commands on the Layout tab, you can make a variety of modifications to the table.
Click the buttons in the interactive below to learn about the different ways you can modify a table with the Layout tab.
labeled graphic

Challenge!

  1. Open an existing Word document. If you want, you can use this example.
  2. Convert some text into a table. If you are using the example, convert the text below By Client.
  3. Apply a table style, and experiment with the table style options. If you are using the example, see if you can make the table match the By Salesperson table above it.
  4. Delete a row from the table.
  5. Insert a blank table with five rows and four columns.
  6. Add borders to the blank table.