MS Office 2010 Installation Process
MS Office 2010: introduction to MS Office Basic Trainig in urdu lecture
**********************************************************************
Microsoft Word 2010 View and Print Document in Urdu Lecture
**********************************************************************
Microsoft Word insert menu lecture
*********************************************************************
Password-protect workbooks MS Excel
Protect a workbook with a password to prevent others from adding, moving, deleting, hiding, or renaming the worksheets in the workbook.
- Select File > Save As, or press F12.
- In the Save As box, select Tools, and then select General Options.
- Enter a password in the Password to open box, and then select OK.
- Re-enter the password in the Confirm Password box, and then select OK.
- Select Save, and then select Yes If you wish to replace the existing file.
- Select File > Save As, or press F12.
- In the Save As box, select Tools, and then select General Options.
- Enter password in the Password to modify box, and then select OK.
- Re-enter the password in the Confirm Password box, and then select OK.
- Select Save, and then select Yes If you wish to replace the existing file.
- Select File > Save As, or press F12.
- In the Save As box, select Tools, and then select General Options.
- Enter different passwords in the Password to modify and Password to open boxes, and then select OK.
- In the Confirm Password box, re-enter the password in the Reenter password to proceed field and then select OK.
- In the Confirm Password box, re-enter the password in the Reenter password to modify field and then select OK.
- Select Save, and then select Yes If you wish to replace the existing file.
- *********************************************************************
A PivotTable is a powerful tool to calculate, summarize, and analyze data that lets you see comparisons, patterns, and trends in your data.
Create a PivotTable - Select the cells you want to create a PivotTable from.NOTE: Your data shouldn't have any empty rows or columns. It must have only a single-row heading.
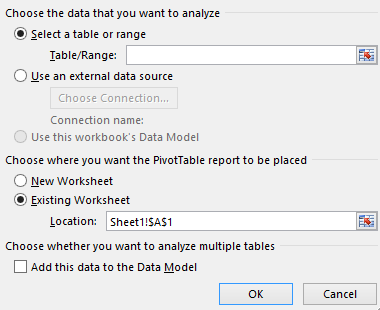
- Select Insert > PivotTable.

- Under Choose the data that you want to analyze, select Select a table or range.

- In Table/Range, verify the cell range.
- Under Choose where you want the PivotTable report to be placed, select Newworksheet to place the PivotTable in a new worksheet.
- Select OK.
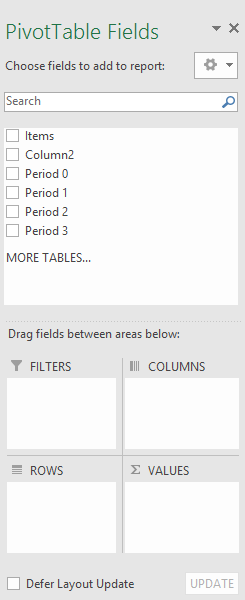
- To add a field to your PivotTable, select the field name checkbox in the PivotTables Fields pane.NOTE: Selected fields are added to their default areas: non-numeric fields are added to Rows, date and time hierarchies are added to Columns, and numeric fields are added to Values.

- To move a field from one area to another, drag the field to the target area.


0 comments:
Post a Comment