How to Create a Grass Action Text Effect in Adobe Photoshop
In this tutorial I will show you how to create a grass action in Adobe Photoshop using two brushes, and a layer style with a grass pattern. At the end of the tutorial you will have an action that lets you perform almost the entire process with a single click.
If you'd like to skip this tutorial but still wish to buy the action, you can head over to GraphicRiver and buy Grass Generator. The complete action has additional features, it works with 72 dpi and 300 dpi, and it also works with shapes.

Tutorial Assets
The following assets were used during this tutorial:
- Plump Font
- Background JPG image
- Grass Pattern
1. How to Create the Brushes
Step 1
Open Photoshop and create a new 350 x 460 px document.

Step 2
Press D on your keyboard to reset the Foreground and Background colors. Then pick the Ellipse Tool (U), and change its mode to shape.

Step 3
Start by drawing a long and thin oval shape.

Step 4
Now pick the Convert Point Tool and Control-Click on the center of the shape.

Step 5
Now click on the anchor point at the top to make it pointy. Do the same thing on the anchor point at the bottom.

Step 6
Control-Click on the thumbnail of the Ellipse 1 layer to create a selection around the shape. Then go to Edit > Define Brush Preset..., name it Base Brush and click OK.

Step 7
Pick the Brush Tool (B), and then Right-Click on the document and select the brush that we just created (Base Brush).

Step 8
Go to Window > Brush to open the Brush panel. Then set these settings in Brush Tip Shape:
- Size: 27 px
- Flip X: Unchecked
- Flip Y: Unchecked
- Angle: 0º
- Roundness: 100%
- Spacing: 130%

Step 9
Select Shape Dynamics with these settings:
- Size Jitter: 32%
- Control: Off
- Minimum Diameter: 7%
- Angle Jitter: 35%
- Control: Off
- Roundness Jitter: 26%
- Control: Off
- Minimum Roundness: 100%
- Flip X Jitter: Unchecked
- Flip Y Jitter: Unchecked
- Brush Projection: Unchecked

Step 10
Select Scattering with these settings:
- Scatter: 62%
- Both Axes: Unchecked
- Control: Off
- Count: 5
- Count Jitter: 100%
- Control: Off

Step 11
Select Color Dynamics with these settings:
- Apply Per Tip: Checked
- Foreground/Background Jitter: 100%
- Control: Off
- Hue Jitter: 2%
- Saturation Jitter: 13%
- Brightness Jitter: 11%
- Purity: -1%
Color Dynamics makes no difference to the final result of this tutorial, but it's important if you want to use the brush with other things.

Step 12
Now click on the icon in the top right corner of the Brush panel and choose New Brush Preset. Then name it Grass Brush 1 and check the Capture Brush Size in Preset box. After that, click OK.

Step 13
Now let's create a new preset. Go back to Brush Tip Shape in the Brush panel and make these changes:
- Size: 18 px
- Flip X: Unchecked
- Flip Y: Unchecked
- Angle: 0º
- Roundness: 100%
- Spacing: 339%

Step 14
Don't change the Shape Dynamics settings; just leave it selected. Then select Scattering and make these changes:
- Scatter: 50%
- Both Axes: Unchecked
- Control: Off
- Count: 8
- Count Jitter: 0%
- Control: Off

Step 15
Leave Color Dynamics selected and save the preset as before, but this time name it Grass Brush 2.

2. How to Create the Text and Install the Pattern
Step 1
Go to File > Open..., and open the background that you downloaded (Background-Grass.jpg).

Step 2
Pick the Type Tool (T) and write "GRASS". Choose the Plump font, and then set the Size to 300 pt.

Step 3
Go to Edit > Presets > Preset Manager. In the Preset Type, select Patterns, click load..., and choose Grass Pattern.pat. After that, click Done.

3. How to Create the Action
Step 1
Go to Window > Actions to open the Actions panel.

Step 2
Let's create a new set of actions. To do so, click the Create New Set icon, name it Grass Set, and click OK.

Step 3
Click the Create New Action icon, name it Grass Text, and click Record.
From this point on, everything you do will be recorded, so keep an eye on the Actions panel. If you make a mistake, click the Stop Playing/Recording icon, and delete the unnecessary step from the action Grass Text. Then click the Begin Recording icon to continue.

Step 4
With the text layer selected, go to Layer > Rename Layer... and rename it 1.

Step 5
Create a new layer by clicking on the Create a New Layer icon, name it Grass 1, and click OK.

Step 6
Select the layer 1 and go to Type > Create Work Path.

Step 7
Now select the layer Grass 1. Then pick the Brush Tool (B) and select the Grass Brush 1 with these settings.
- Mode: Normal
- Opacity: 100%
- Flow: 100%
- Pen Related Options: Unchecked

Step 8
Go to Window > Paths to open the Paths panel. Then right-click the Work Path and choose Stroke Path. Choose Brush with Simulate Pressure unchecked, and then click OK.

Step 9
Select layer 1. Then create a new layer and name it Grass 2.

Step 10
Now pick the Brush Tool (B) with these settings:
- Brush: Grass Brush 2
- Mode: Normal
- Opacity: 100%
- Flow: 100%
- Pen Related Options: Unchecked

Step 11
Go back to the Paths panel. Right-click the Work Path and choose Stroke Path. Just like before, choose Brush with Simulate Pressure unchecked, and then click OK. After that, delete the Work Path.

Step 12
Now select the layer 1 again. Then hold down the Shift key and click on the layer Grass 1 to select all layers (except the Background layer).

Step 13
Right-click on the layer Grass 1 and choose Convert to Smart Object.

Step 14
Now double-click on the layer Grass 1 to open the Layer Style window. Let's start with Bevel & Emboss:
- Style: Inner Bevel
- Technique: Smooth
- Depth: 100%
- Direction: Up
- Size: 26 px
- Soften: 0%
- Use Global Light: Unchecked
- Angle: 90º
- Altitude: 30º
- Gloss Contour: Linear
- Anti-Aliased: Unchecked
- Highlight Mode: Screen
- Highlight Mode Color:
#ffffff - Highlight Mode Opacity: 16%
- Shadow Mode: Multiply
- Shadow Mode Color:
#000000 - Shadow Mode Opacity: 30%

Step 15
Add an Inner Shadow with these settings:
- Blend Mode: Multiply
- Color:
#000000 - Opacity: 22%
- Use Global Light: Unchecked
- Angle: -90º
- Distance: 14 px
- Choke: 16%
- Size: 4 px
- Contour: Linear
- Anti-aliased: Unchecked
- Noise: 0%

Step 16
Add a Gradient Overlay with these settings:
- Blend Mode: Overlay
- Dither: Unchecked
- Opacity: 46%
- Reverse: Unchecked
- Style: Linear
- Align with Layer: Checked
- Angle: 90º
- Scale: 89%
Click on the Gradient Bar and make a gradient with these settings:
- First Stop Color:
#000000 - First Stop Position: 0%
- Second Stop Color:
#FFFB9C - Second Stop Position: 100%

Step 17
Add a Pattern Overlay with these settings:
- Blend Mode: Normal
- Opacity: 100%
- Pattern: Choose the Grass Pattern that you installed at the beginning of the tutorial.
- Scale: 25%
- Link with Layer: Checked

Step 18
Add a Drop Shadow with these settings:
- Blend Mode: Multiply
- Color:
#000000 - Opacity: 31%
- Use Global Light: Unchecked
- Angle: 23º
- Distance: 12 px
- Spread: 0%
- Size: 1 px
- Contour: Linear
- Anti-Aliased: Unchecked
- Noise: 0%
- Layer Knocks Out Drop Shadow: Checked
After that, click OK.

Step 19
Rename the layer Grass 1 to Grass Text. After that, click on the Stop Playing/Recording icon in the Actions panel.

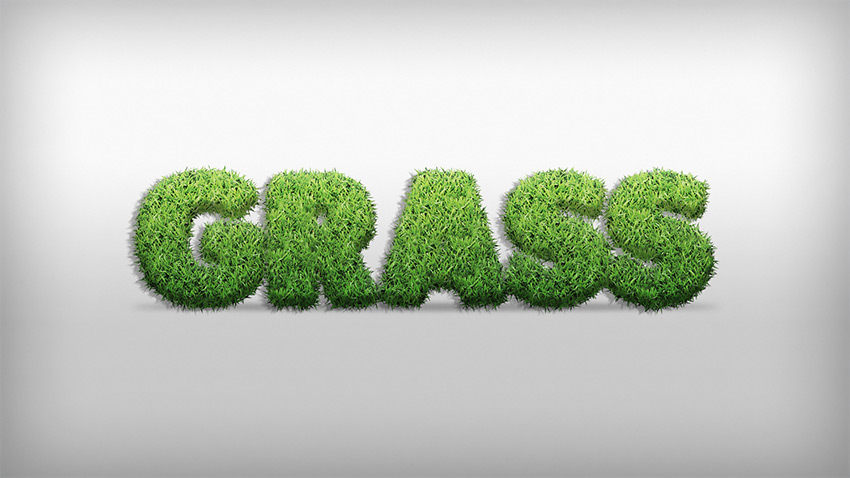
And the result is:

Congratulations, You're Now Done!
In this tutorial, you learned how to create a grass action in Adobe Photoshop.
We started out by creating our brushes, then we created the text, and while recording an action, we added a border to it using the brushes and a Path, then finally a Layer Style to make it look like grass.
Things to Remember Before Playing the Action:
- Make sure that you have installed the Pattern.
- Make sure that the Brush Opacity and Flow are set to 100%.
- Make sure that you are playing the action with the text layer selected.
To play it, you need to select the action Grass Text and click Play on the Actions panel. I hope you have enjoyed this tutorial, and feel free to leave your comments below. This action we just created is part of Grass Generator.


0 comments:
Post a Comment