Tuesday 24 January 2017

Get creative with Photoshop Blend Modes


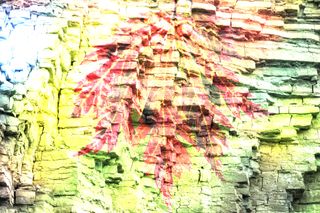
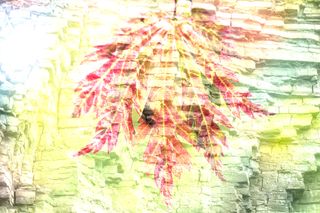
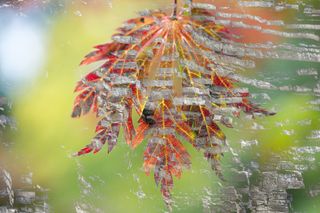
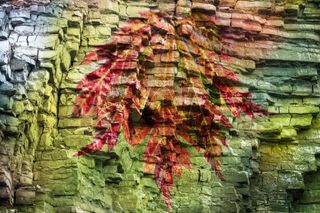
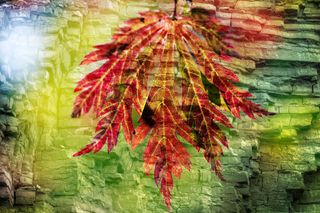
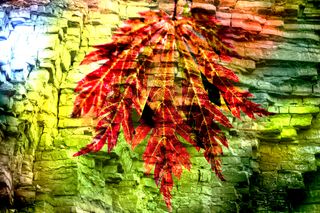
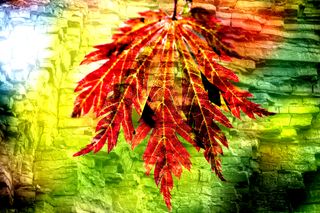
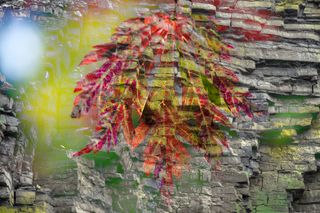
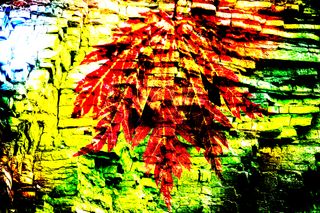
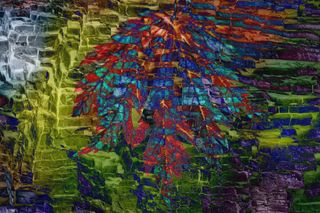
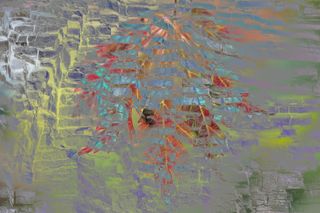
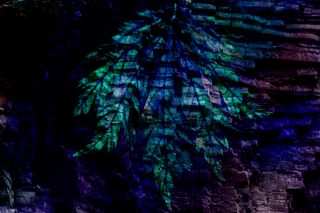
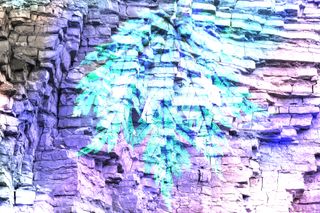
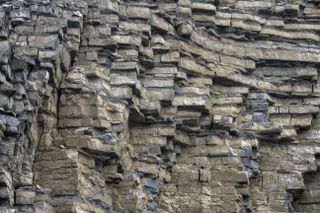
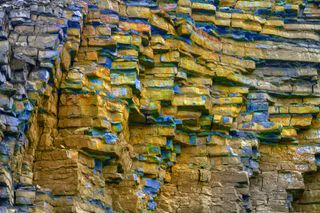
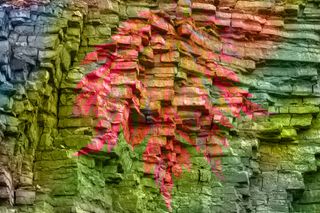
With 26 Blend Modes on offer, there are plenty of effects to experiment with. Here’s what each mode does...

Photoshop Blend Modes give you the power to combine layers and images for a huge variety of effects. Read on to learn how these Photoshop effects work, and discover some of the wonderful things you can do with them...

01. Dissolve


A simple pixelated blend

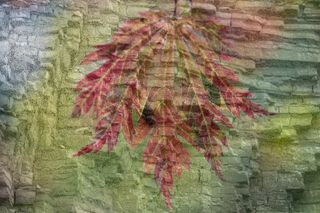
Creates a pixelated blend, the effects of which only become apparent when you begin to lower layer opacity (50% here).
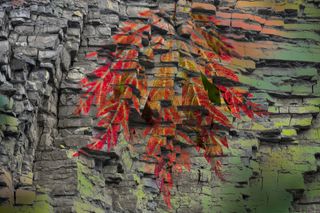
02. Darken


As the name suggests, Darken leaves darker pixels unchanged

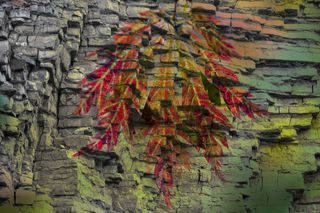
Lighter pixels on the top layer are replaced by the colours and tones from the layer below, while darker pixels remain unchanged.

03. Multiply


Base colours are given a boost

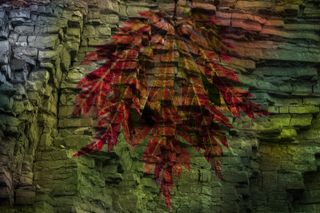
Multiplies colours in the layer with those below. Colours on the top layer that are lighter are replaced with those on the lower layer.

04. Color Burn


Colour Burn creates rich results

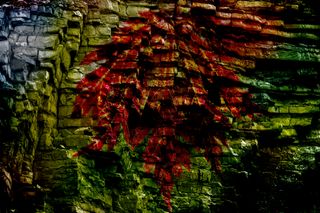
Increases the contrast between each layer. Light pixels on the top layer don’t affect the colours and tones on the layer below.

05. Linear Burn


Linear Burn leaves top light pixels alone

Lowers the brightness of layers below to reflect the colours of the top layer. Lighter pixels on the top layer produce no change.
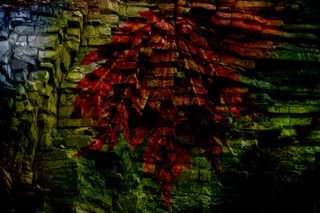
06. Darker Color


Darker pixels are reflected

Selects either the top layer’s colour or those on the layer below – whichever is darker – as the resulting colours. 

07. Lighten


Lighter colours on top layers stay in place

The opposite of Darken. Any colours on the top layer that are lighter than the colours underneath will remain visible.
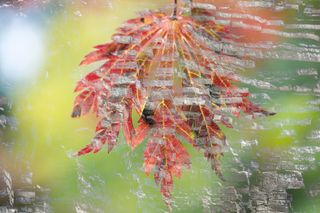
08. Screen


Inverse colours are multiplied

The opposite of Multiply. Works out the inverse of the layer’s colours and multiplies it with those on the layer below.

09. Color Dodge


Create light, vibrant tones with Colour Dodge

Causes lighter tones on the layer to create more vibrant colours and increase contrast. Darker pixels make no difference.

10. Linear Dodge (Add)


Linear Dodge has strong brightening

Similar to Colour Dodge and Screen Blend, but the brightening is stronger. Dark colours make no changes to the colours below.

11. Lighter Color


Layer values are compared with Lighter Color

Compares the colour channel values with the layer below and chooses the higher values to create the resulting colour.
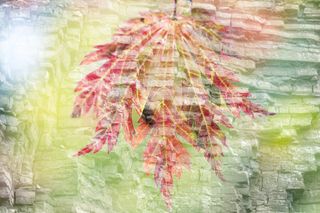
12. Overlay


Overlay has a subtle touch

Provides a subtle way of adding a wash of the lower layer’s colour to the top layer while preserving the lower layer’s detail.

13. Soft Light


Top layers get adjusted with Soft Light

Darkens or lightens the colours of the top layer, depending on the colours of the layer underneath. Like Overlay, but more subtle.

14. Hard Light


Hard Light brightens dark pixels

Multiplies or screens the colours, depending on the colours of the layer underneath. Pixels lighter than 50% grey are lightened.

15. Vivid Light


Colours become more intense

Lightens or darkens colours with more intensity than Soft or Hard Light. If the layer is lighter than 50% grey, the image is lightened.

16. Linear Light


Create greater contrasts with Linear Light

Like Vivid Light, but adjusts brightness rather than contrast. If the layer is lighter than 50% grey, the image is lightened.

17. Pin Light


Darker pixels come to the fore

If a pixel on the layer is lighter than 50% grey and the pixels below are darker, the top pixels are replaced by the ones below.

18. Hard Mix


Drastically change primary colours

Adds the layer’s red, green and blue channel values to those of the lower layer, changing the layer’s pixels to primary colours.

19. Difference


Light colours get inverted

Lighter colours are inverted, and darker colours are replaced by the pixels below. Blending with black makes no change.

20. Exclusion


Colours are inverted with low level contrast

Like Difference, but with less contrast. Lighter colours are inverted, and darker colours are replaced by the pixels below.

21. Subtract


Subtract can create cool results

Studies the colours in each channel, then subtracts the colours in the selected layer from the colours underneath.

22. Divide


Divide produces a negative style image

Examines the colours in each channel and divides the top layer’s colours by the colours in the layer below.

23. Hue


Hue strips away saturation

Mixes the layer colours with the luminance and saturation of the layer below. So the colours remain, but saturation is reduced.

24. Saturation


Vlues get combined for unique results

Combines the saturation values of the top layer’s colour with the luminance and hue values of the colours on the layer below.

25. Color


Low level luminance is brought forwards

Similar to Hue, but mixes the hue and saturation of the top layer’s colour with the luminance of the colours from the lower layer.

26. Luminosity


Detail and colours both have a place in Luminosity

Mixes luminance with the hue and saturation of the layer below; you see detail from the top layer and colour from below.

Build vintage effects with Photoshop plugin Analog Effex Pro


Get the retro look with faded colours, vintage effects and old‑fashioned imperfections.


Anyone who likes vintage Photoshop effects (and going by the success of Instagram, that’s just about everyone) will find plenty to enjoy in Analog Efex Pro. There’s a whole host of film-inspired imperfections like light leaks, dust and scratches, messy borders, vignettes and blur effects.

01. Choose a preset


Several stock effects are waiting to be used

Open an image in Photoshop. Right-click the layer and choose Convert To Smart Object. Go to Filter > Nik Collection > Analog Efex Pro 2. Click OK when the warning shows. Click Classic Camera then experiment with the tool combinations, each of which opens up several presets to play with.

02. Adjust the settings


Settings can be easily adjusted with sliders

Once you’ve chosen a preset – we picked Vintage Camera 3 here – you can fine-tune the settings on the right. You can also turn off any parts of the effect you dislike by clicking the ticks. We’ve toned down Detail Extraction here. Double-click any individual slider to reset it.

03. Build a camera


Enhance effects with the Camera Kit

Click the top-left button again to access the tools and combinations. Click Camera Kit. This shows all the tools on the left. You can click the plus sign next to any to add them in and enhance your image. We’ve added Dust and Scratches, then tweaked the positioning. Once done, click OK.

6 Essential Photoshop layers to improve your images


The six most frequently used Photoshop layers for image editing, and how to use them to improve almost any photo.

Photoshop has many types of layers and adjustment layers available, but there are six that you’ll find you need to use again and again. Learning how they should be used may seem a little daunting for beginners, but there are plenty of Photoshop tutorials to help you out, and once you’ve got to grips with them, you’ll find they play a part in the creative process of almost every image you make.
Here are the essential Photoshop layers you need to know about, and details on how to use them.  

01. Levels


A Levels Adjustment layer is the foundation of lots of Photoshop images

This should be the first layer you add to an image, because it fundamentally alters the tonal range of the entire image. Create a Levels Adjustment Layer, drag the Black Point slider inwards until it touches the lefthand edge of the histogram, and drag the White Point slider inwards to the right-hand edge. This remaps the tones of the image to make more of the available tonal range.

02. Curves


Use Curves to adjust the brightness and shadows

Curves is one of the most powerful adjustment layers. An S-shaped curve brightens the highlights and darkens the shadows, resulting in extra contrast. 

Create a Curves Adjustment Layer and click the middle of the diagonal line to add a central control point. Drag down on the lower part of the line and drag up on the upper part of the line to improve image contrast.

03. Hue/ Saturation


Make small adjustments to individual colours with the Hue/Saturation layers

This adjustment layer is best used for altering the intensity and brightness of individual colour channels in an image – greens and blues in landscapes, for instance. Create a Hue/Saturation Adjustment Layer, click the Master menu and choose the colour channel you’d like to adjust. Small changes are usually the most effective.

04. Healing layer


Scrub out blemishes with the Spot Healing Brush

Most photos contain unwanted marks or blemishes. The Spot Healing Brush tool is effective at removing these. The best way to apply the healing is on a new blank layer, so that you can easily tone down or remove selected healing work later without having to start from scratch because you healed directly on the background layer. To do this, create a new blank layer, choose the Spot Healing Brush tool from the Tools panel and tick Sample All Layers on the Options Bar, then continue as normal.

05. Dodge and Burn


Dodge and Burn can brighten up or darken specific areas

One of the best ways to enhance a photo is by lightening or darkening selected areas of the image. This can be done with the Dodge and Burn tools, but rather than use them directly on the image, a separate grey layer gives you greater control. To create a Dodge and Burn layer, hold down Alt and click the Create a new layer icon in the Layers panel. Give the layer a name, then choose Mode: Overlay. Check Fill with Overlay-neutral colour and click OK. Now use the Dodge and Burn tools (with Range set to Midtones) to work on the new layer.

06. Selective sharpening


The Sharpen tool gives photo editors a greater level of control

Once all other adjustments have been made, you need to sharpen the image for output. The traditional way is to create a merged layer at the top of the stack, apply Unsharp Mask, then paint on the mask to remove the sharpening from those parts of the image you want to remain soft. However, the Sharpen tool enables more control over the process by enabling you to build up the effect by brushing repeatedly with a low opacity brush. Create a new blank layer, select the Sharpen tool, tick Sample All Layers and set a Strength of 50% or lower.